How to Check Your Car's Engine Oil Levels
Maintaining proper engine oil levels is crucial for the longevity and performance of your vehicle. Engine oil lubricates moving parts, reduces friction, and helps dissipate heat. Low oil levels can lead to severe engine damage, resulting in costly repairs or even total engine failure. This article will guide you through the process of checking engine oil levels, helping you understand why it's essential, how to do it correctly, and what to do if you find that your oil levels are low.
Why Checking Engine Oil Levels Is Important
Before diving into the how-to, let’s discuss why checking your engine oil levels is essential.
1. Prevents Engine Wear and Tear
Engine oil acts as a lubricant for various engine components, reducing friction and preventing wear and tear. Regularly checking your oil levels ensures that your engine is adequately lubricated, helping to prolong its life.
2. Avoids Overheating
Oil helps to dissipate heat generated by the engine. If your oil levels are low, it can lead to overheating, which can damage engine components and lead to significant repair costs.
3. Improves Fuel Efficiency
A well-lubricated engine operates more efficiently, which can improve fuel economy. Low oil levels can increase friction, causing your engine to work harder and consume more fuel.
4. Promotes Smooth Operation
Proper oil levels ensure that the engine operates smoothly. Insufficient oil can lead to engine knocking, rough idling, and other performance issues.
5. Environmental Considerations
Using the right amount of oil reduces harmful emissions and protects the environment. Proper maintenance of your vehicle, including checking oil levels, contributes to overall sustainability.
When to Check Engine Oil Levels
Knowing when to check your engine oil levels is as important as knowing how to do it. Here are some guidelines:
-
Before Long Trips: Always check your oil before embarking on long journeys, especially if you're driving in extreme temperatures.
-
Monthly Checks: As a general rule, check your oil levels at least once a month, or every time you fill up your gas tank.
-
After Oil Changes: After getting an oil change, it’s a good idea to check your oil levels to ensure everything was done correctly.
-
If You Notice Warning Lights: If your vehicle's oil pressure warning light comes on, check your oil levels immediately.
Tools You Will Need
To check your engine oil levels, you will need a few basic tools:
-
Oil Dipstick: This is usually a metal or plastic rod that extends into your engine oil pan.
-
Clean Rag or Paper Towel: For wiping the dipstick clean and checking oil quality.
-
Funnel: If you need to add oil, a funnel will help avoid spills.
-
New Oil: Make sure you have the correct type of oil for your vehicle.
Step-by-Step Guide to Checking Engine Oil Levels
Now that you understand the importance of checking your oil levels, let’s walk through the process step-by-step.
Step 1: Prepare Your Vehicle
-
Park on Level Ground: Ensure your vehicle is parked on a flat surface. This helps to get an accurate reading of the oil level.
-
Turn Off the Engine: Wait for a few minutes after turning off the engine to allow the oil to settle in the oil pan.
-
Pop the Hood: Open the hood of your vehicle and secure it with the prop rod.
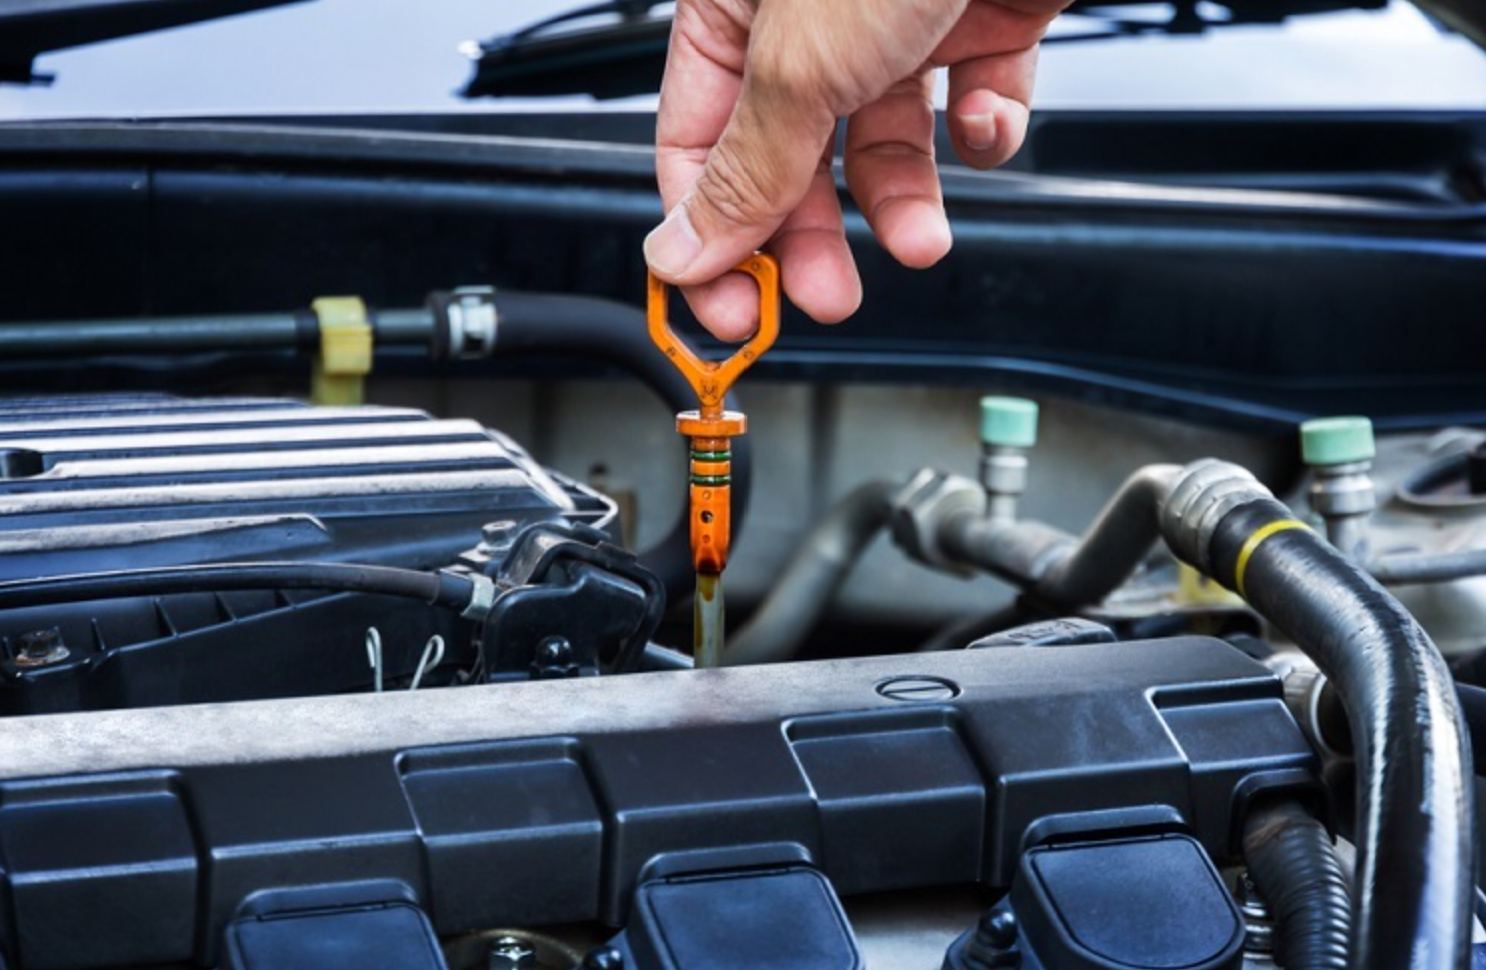
Step 2: Locate the Dipstick
-
Find the Dipstick: The dipstick is usually located near the front of the engine and has a brightly colored handle, often yellow or orange. Consult your owner’s manual if you have trouble finding it.
Step 3: Remove the Dipstick
-
Pull the Dipstick Out: Grasp the dipstick by its handle and pull it out slowly.
-
Wipe the Dipstick Clean: Use a clean rag or paper towel to wipe off the oil from the dipstick. This ensures that your reading will be accurate.
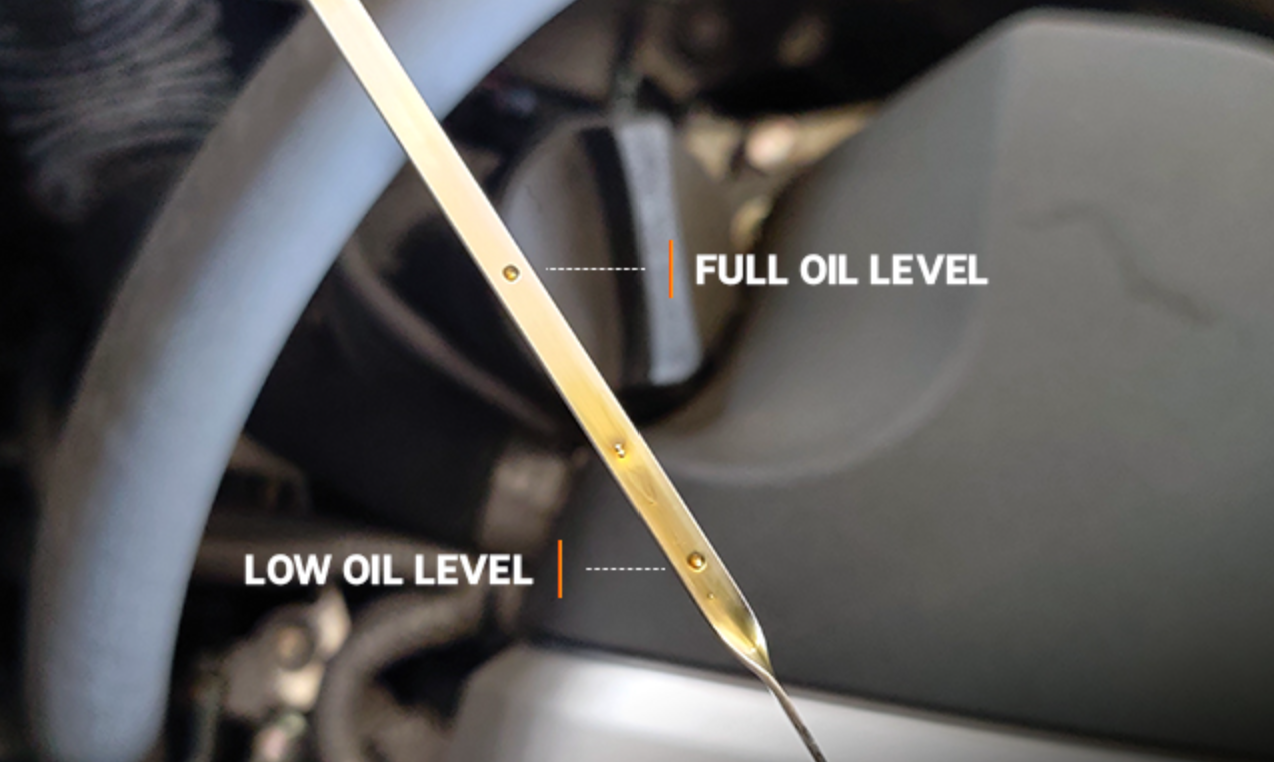
Step 4: Check the Oil Level
-
Reinsert the Dipstick: Insert the dipstick back into the tube fully.
-
Remove the Dipstick Again: Pull it out once more and hold it horizontally.
-
Read the Oil Level: Look at the markings on the dipstick. There will usually be two marks indicating the minimum and maximum oil levels. The oil level should fall between these two marks. If it’s below the minimum mark, you need to add oil.
Step 5: Assess Oil Quality
While you have the dipstick out, take a moment to assess the quality of the oil:
-
Color: New oil is typically a clear amber color. If the oil is dark brown or black, it may need to be changed.
-
Texture: Rub a small amount of oil between your fingers. It should feel smooth. If it feels gritty or contains particles, it’s time for an oil change.
-
Smell: If the oil smells burnt, it’s an indication that it’s time to change it.
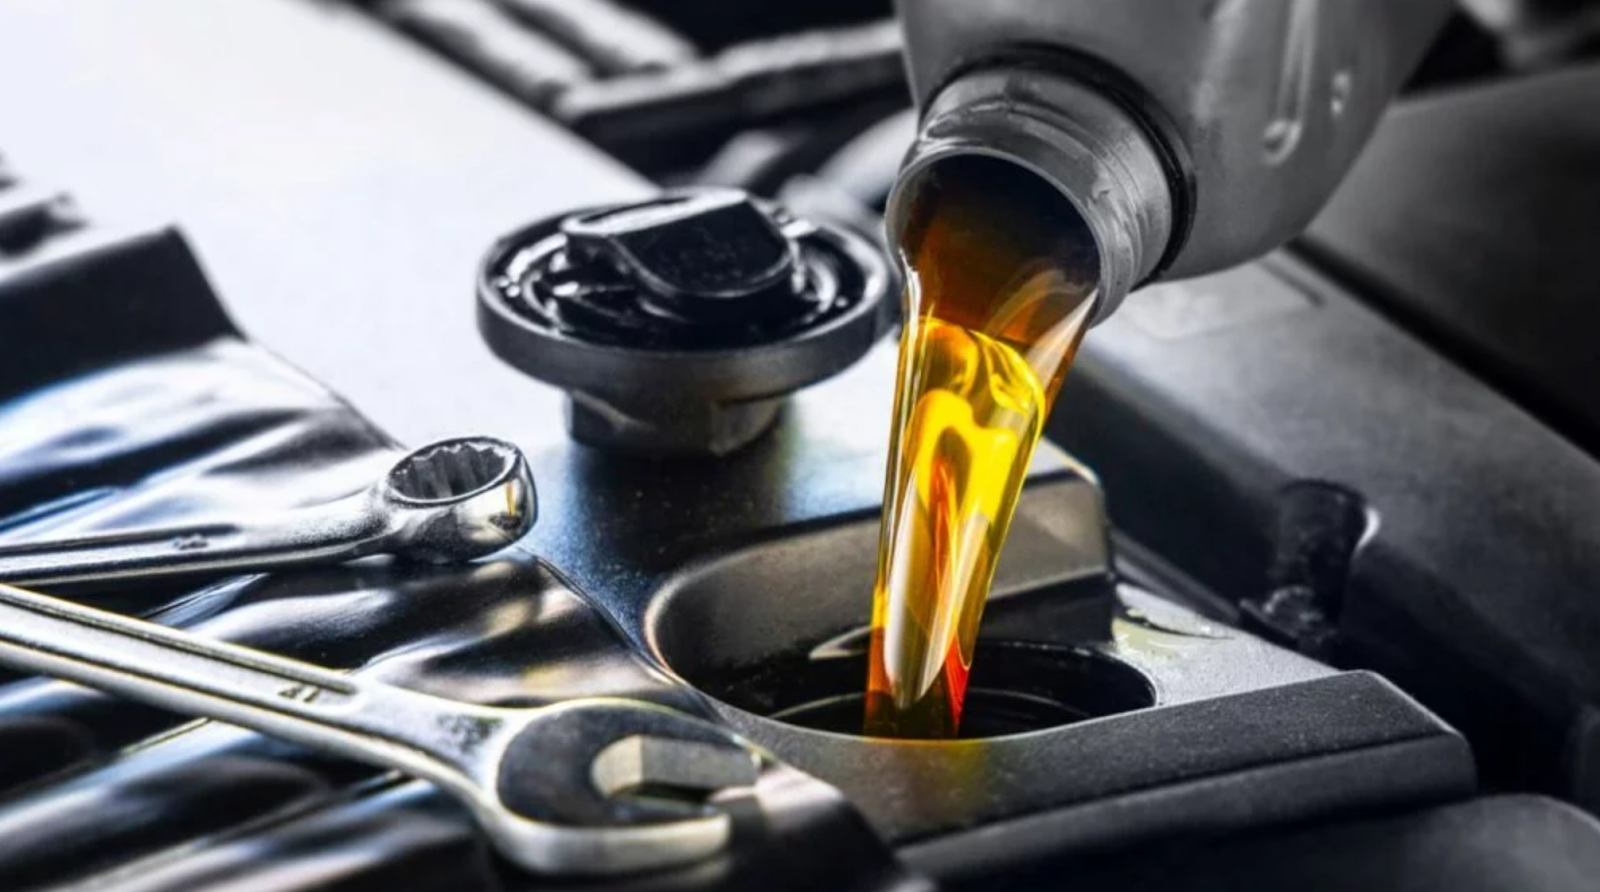
Step 6: Add Oil If Necessary
If your oil level is low:
-
Select the Right Oil: Consult your owner’s manual for the recommended oil type and viscosity.
-
Remove the Oil Filler Cap: Locate the oil filler cap, usually marked with an oil can icon. Remove it carefully.
-
Use a Funnel: Insert a funnel into the opening to avoid spills.
-
Add Oil Gradually: Pour in a little oil at a time, checking the dipstick frequently to avoid overfilling. Remember, it's easier to add more oil than to remove it.
-
Replace the Filler Cap: Once the oil level is correct, replace the oil filler cap securely.
Step 7: Clean Up and Dispose of Oil Properly
If you’ve added oil, clean up any spills. Also, if you have leftover oil, take it to a recycling center. Never pour oil down the drain or throw it in the trash.
Conclusion
Checking your engine oil levels is a simple yet crucial maintenance task that every vehicle owner should be familiar with. By following the steps outlined in this guide, you can ensure that your engine remains well-lubricated, operates efficiently, and lasts longer. Regularly checking your oil levels can save you time and money in the long run and keep your vehicle running smoothly. Remember, when in doubt, consult your owner’s manual or seek the advice of a professional mechanic. Regular maintenance, including oil checks, will contribute to a safer and more reliable driving experience.
LATEST

Last updated: Sep 10, 2024

Last updated: Sep 10, 2024

Last updated: Sep 10, 2024

Last updated: Aug 31, 2024
Last updated: Aug 19, 2024
.png)
Last updated: Aug 31, 2024